The Ultimate Guide to Making Delicious Stottie Bread
Stottie bread. Just the name conjures up images of hearty North East England breakfasts, comforting sandwiches, and a truly unique culinary experience. This isn't your average loaf; Stottie's distinctive flat, round shape and soft, slightly chewy texture make it a regional treasure. This comprehensive guide will walk you through a foolproof recipe, ensuring you can bake your own perfect Stottie at home.
Understanding the Stottie: More Than Just Bread
Before we dive into the recipe, let's understand what makes Stottie bread so special. It's not just the slightly flattened shape – although that's certainly part of its charm. The key lies in its texture: a soft, pillowy crumb with a slightly crisp crust. This unique texture comes from a combination of ingredients and baking techniques, which we'll explore in detail.
Key Characteristics of Authentic Stottie Bread:
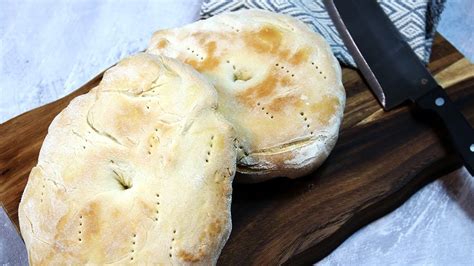
- Flat, round shape: Distinctly different from a standard round loaf.
- Soft, pillowy crumb: The inside should be delightfully soft and airy.
- Slightly crisp crust: A delicate contrast to the soft interior.
- Neutral flavor: This allows it to complement various fillings and toppings.
The Stottie Bread Recipe: A Step-by-Step Guide
This recipe yields one large Stottie. Feel free to double or even triple it depending on your needs.
Ingredients:
- 500g strong white bread flour (plus extra for dusting)
- 7g fast-action dried yeast
- 10g salt
- 300ml lukewarm water
- 1 tbsp olive oil (optional, for extra richness)
Instructions:
-
Activate the Yeast: In a large bowl, combine the lukewarm water and yeast. Let it sit for 5-10 minutes until foamy. This confirms your yeast is alive and ready to work its magic!
-
Combine Ingredients: Add the flour, salt, and olive oil (if using) to the yeast mixture. Mix with a wooden spoon or your hands until a shaggy dough forms.
-
Knead the Dough: Turn the dough out onto a lightly floured surface and knead for 8-10 minutes until it becomes smooth and elastic. If using a stand mixer, knead with the dough hook attachment for around 6-8 minutes.
-
First Rise: Place the dough in a lightly oiled bowl, turning to coat. Cover with plastic wrap and let it rise in a warm place for 1-1.5 hours, or until doubled in size.
-
Shape the Stottie: Gently punch down the dough to release the air. On a lightly floured surface, roll the dough into a roughly 20cm diameter circle. The thickness should be relatively even, aiming for about 2-3cm. This is where you achieve that characteristic flat shape.
-
Second Rise (Proofing): Place the shaped Stottie onto a baking sheet lined with baking paper. Cover loosely with plastic wrap and let it rise for another 30-45 minutes.
-
Bake the Stottie: Preheat your oven to 220°C (200°C fan/425°F/Gas Mark 7). Bake the Stottie for 25-30 minutes, or until it's golden brown and sounds hollow when tapped on the bottom.
-
Cool and Enjoy: Let the Stottie cool completely on a wire rack before slicing and enjoying.
Tips for Stottie Success
- Flour Power: Using strong bread flour is crucial for achieving the right texture.
- Water Temperature: Lukewarm water is key for activating the yeast. Too hot, and you'll kill it; too cold, and it won't activate properly.
- Kneading is Key: Proper kneading develops the gluten, resulting in a soft yet slightly chewy crumb.
- Don't Overbake: Keep a close eye on your Stottie in the oven to prevent burning.
Serving Suggestions: Beyond the Basic
Stottie bread is incredibly versatile. Here are a few ideas to get you started:
- Classic Stottie Cake: Filled with butter, cheese, and beans.
- Savory Stottie: Try ham, cheese, and salad.
- Sweet Stottie: Filled with jam, Nutella, or cream.
With its simple ingredients and satisfying results, making Stottie bread at home is a rewarding experience. So, gather your ingredients, follow this recipe, and enjoy the taste of North East England in your kitchen!

