Tiger Bread Recipe: A Deliciously Striped Loaf
Tiger bread, with its distinctive tiger stripes, is a beautiful and delicious addition to any bread basket. This recipe will guide you through making your own, from start to finish. We'll focus on achieving that perfect, visually appealing striped crust while ensuring a soft and flavorful interior.
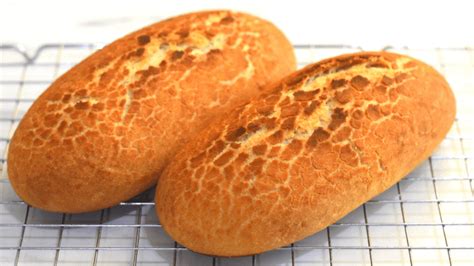
Understanding the Tiger Bread Effect
The characteristic stripes of tiger bread aren't just for show; they're created by a clever baking technique. A simple dough is enriched with a flavorful topping, then carefully scored to allow for expansion during baking, resulting in those striking, golden-brown stripes.
Key Ingredients for Success
Before we dive into the steps, let's gather our essential ingredients:
-
For the Dough:
- 500g strong bread flour
- 7g fast-action dried yeast (or 21g fresh yeast)
- 10g salt
- 30g caster sugar
- 300ml lukewarm water
- 2 tbsp olive oil
-
For the Topping:
- 50g strong bread flour
- 25g polenta (coarse cornmeal)
- 25g olive oil
- 1 tsp salt
Step-by-Step Tiger Bread Recipe
Now, let's get baking!
1. Making the Dough:
- In a large bowl, combine the flour, yeast, and salt.
- Add the sugar and olive oil.
- Gradually add the lukewarm water, mixing with a wooden spoon or your hands until a shaggy dough forms.
- Turn the dough out onto a lightly floured surface and knead for 8-10 minutes until smooth and elastic. If using a stand mixer, knead with the dough hook for 6-8 minutes.
- Place the dough in a lightly oiled bowl, cover with plastic wrap, and let it rise in a warm place for 1-1.5 hours, or until doubled in size.
2. Preparing the Topping:
- While the dough is rising, prepare the topping. In a small bowl, combine the flour, polenta, olive oil, and salt. Mix well until a crumbly mixture forms.
3. Shaping and Scoring the Tiger Bread:
- Once the dough has doubled, gently punch it down to release the air.
- Turn the dough out onto a lightly floured surface and shape it into a rough rectangle.
- Sprinkle the topping evenly over the surface of the dough, pressing it gently to adhere.
- Using a sharp knife or lame, make several deep cuts across the dough's surface, creating the characteristic tiger stripes. Try to cut at roughly 1cm intervals. Don't be afraid to make them deep! This is crucial for creating the striking stripes.
4. Second Proof and Baking:
- Place the shaped loaf on a baking sheet lined with baking paper.
- Cover loosely with plastic wrap and let it proof for another 30-45 minutes, or until almost doubled in size.
- Preheat your oven to 220°C (200°C fan/425°F/Gas Mark 7).
- Bake for 25-30 minutes, or until the loaf is golden brown and sounds hollow when tapped on the bottom.
- Remove from the oven and let it cool completely on a wire rack before slicing and serving.
Tips for Tiger Bread Success:
- Flour Power: Use good quality strong bread flour for the best results.
- Water Temperature: Ensure the water is lukewarm, not hot, to avoid killing the yeast.
- Deep Cuts: The deeper the cuts, the more dramatic the tiger stripes will be.
- Cooling Time: Allow the bread to cool completely before slicing to prevent a gummy texture.
Serving Suggestions:
Enjoy your homemade tiger bread with butter, cheese, soup, or as part of a delicious sandwich. Its versatility makes it a perfect addition to any meal.
This detailed guide will help you bake the perfect tiger bread. Enjoy the process and the delicious results! Remember to share your baking adventures using #TigerBreadRecipe!

