The Ultimate Guide to Baking a Decadent Purple Velvet Cake
Purple velvet cake. The name itself conjures images of rich, luxurious texture and a vibrant, unforgettable hue. This isn't your average chocolate cake; it's a showstopper, perfect for birthdays, anniversaries, or any occasion calling for a truly special dessert. This comprehensive guide will walk you through creating this magnificent cake, from ingredient selection to baking tips and frosting suggestions. Get ready to impress!
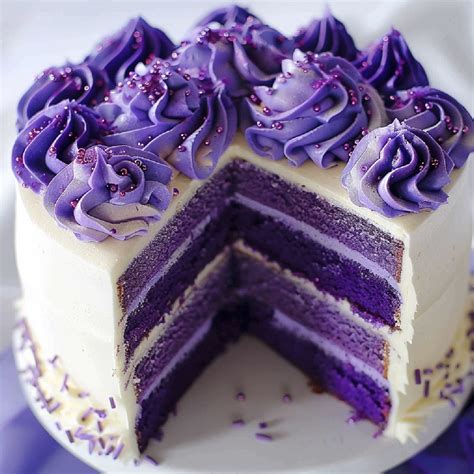
Understanding the Magic Behind Purple Velvet Cake
Unlike red velvet cake, which relies on cocoa powder for its signature color, purple velvet cake achieves its stunning hue through the addition of purple food coloring. However, the similarities don't end there. Both cakes share a characteristically moist and tender crumb, achieved through the careful balance of ingredients and the chemical reaction between the acidic buttermilk and the baking soda. This reaction creates a unique texture that is both light and dense.
Gathering Your Ingredients: A Purple Paradise
Before you begin, make sure you have all the necessary ingredients on hand. This will streamline the baking process and prevent any unwanted interruptions. Here's what you'll need:
- For the Cake:
- 2 1/2 cups all-purpose flour
- 2 cups granulated sugar
- 1 teaspoon baking soda
- 1/2 teaspoon baking powder
- 1/4 teaspoon salt
- 1 cup buttermilk
- 1/2 cup vegetable oil
- 2 large eggs
- 2 teaspoons vanilla extract
- 1 tablespoon white vinegar
- Purple food coloring (gel is recommended for best results)
- For the Cream Cheese Frosting:
- 8 ounces cream cheese, softened
- 1 cup (2 sticks) unsalted butter, softened
- 3-4 cups powdered sugar
- 1 teaspoon vanilla extract
- Pinch of salt
Baking the Perfect Purple Velvet Cake: A Step-by-Step Guide
Step 1: Prepare Your Baking Pans: Grease and flour two 9-inch round baking pans. This will prevent the cake from sticking and ensure easy removal once baked.
Step 2: Dry Ingredients: In a large bowl, whisk together the flour, sugar, baking soda, baking powder, and salt.
Step 3: Wet Ingredients: In a separate bowl, whisk together the buttermilk, oil, eggs, vanilla extract, and vinegar.
Step 4: Coloring: Add the purple food coloring to the wet ingredients, mixing until you achieve your desired shade of purple. Start with a small amount and add more gradually, as gel food coloring can be very potent.
Step 5: Combining: Gradually add the wet ingredients to the dry ingredients, mixing on low speed until just combined. Be careful not to overmix, as this can result in a tough cake.
Step 6: Baking: Divide the batter evenly between the prepared pans. Bake in a preheated oven at 350°F (175°C) for 30-35 minutes, or until a wooden skewer inserted into the center comes out clean.
Step 7: Cooling: Let the cakes cool in the pans for 10 minutes before inverting them onto a wire rack to cool completely.
Creating the Dreamy Cream Cheese Frosting
While the cakes are cooling, prepare the frosting. This is where the magic truly happens!
Step 1: Beat the Butter and Cream Cheese: In a large bowl, beat the softened butter and cream cheese together until smooth and creamy.
Step 2: Add Sugar: Gradually add the powdered sugar, one cup at a time, beating on low speed until combined. Increase the speed to medium and beat until light and fluffy.
Step 3: Flavor and Finish: Add the vanilla extract and salt, and beat until well incorporated. If the frosting is too thick, add a tablespoon or two of milk or buttermilk until you reach your desired consistency.
Assembling Your Masterpiece: Frosting and Decoration
Once the cakes are completely cool, frost the top of one layer with a generous amount of cream cheese frosting. Carefully place the second cake layer on top and frost the entire cake. Get creative with your decorations! You can use sprinkles, fresh berries, chocolate shavings, or even edible flowers to elevate your cake to the next level.
Tips for Success
- Room Temperature Ingredients: Ensure your butter, eggs, and buttermilk are at room temperature for optimal mixing and baking results.
- Don't Overmix: Overmixing the batter can lead to a tough cake. Mix only until the ingredients are just combined.
- Check for Doneness: Use a wooden skewer or toothpick to check for doneness. If it comes out clean, the cake is ready.
- Cool Completely: Allow the cakes to cool completely before frosting to prevent the frosting from melting.
With this comprehensive guide, baking a stunning purple velvet cake is within your reach. Embrace the process, have fun, and enjoy the delicious rewards of your culinary creation! Remember to share your beautiful purple velvet cake creations on social media and tag us! Happy baking!

